Opera と W-ZERO3[es] のカスタマイズについての覚書き…
W-ZERO3[es] |
Opera |
Button |
JavaScript |
menu.ini |
search.ini |
opera6.ini |
mouse.ini |
Google |
未選択 |
■カレンダー
| 10 | 2025/11 | 12 |
| S | M | T | W | T | F | S |
|---|---|---|---|---|---|---|
| 1 | ||||||
| 2 | 3 | 4 | 5 | 6 | 7 | 8 |
| 9 | 10 | 11 | 12 | 13 | 14 | 15 |
| 16 | 17 | 18 | 19 | 20 | 21 | 22 |
| 23 | 24 | 25 | 26 | 27 | 28 | 29 |
| 30 |
■最新記事
■コメント
■トラックバック
■Tags
■ブログ内の検索
■関連商品
■QRコード
■アーカイブ
■カテゴリー
■カウンター
×
[PR]上記の広告は3ヶ月以上新規記事投稿のないブログに表示されています。新しい記事を書く事で広告が消えます。
@pdx.ne.jpメールはプッシュされたタイミングでとれるし、Gmailをメインにしようとしたり、RealVGA化とかも視野に入れてメーラーは、MI-GI-WAなブログさんで公開されている「HDMobiMail」を使わせて頂いています。
インストールはcab形式なので、W-ZERO3[es] で実行してインストール。
この後の設定が重要です。この設定をしないとプッシュされた@pdx.ne.jpメールを受信できません…(,,゜∀゜)
インストールはcab形式なので、W-ZERO3[es] で実行してインストール。
この後の設定が重要です。この設定をしないとプッシュされた@pdx.ne.jpメールを受信できません…(,,゜∀゜)
W-ZERO3[es]からUSBケーブルをはずす。
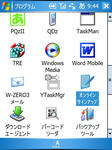
Winキー→[プログラム]→[オンラインサインアップ]
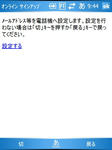
画面の「設定する」をタップ
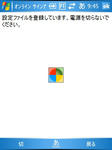
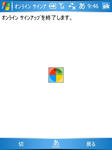
しばらくこの画面…
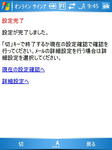
設定完了画面になったら、「切」をタップ
またしばしこの画面…
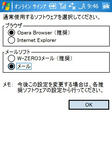
メールソフトのラジオボタンで「メール」を選択!
推奨されてるW-ZERO3メールではない!
「OK」をタップ
再起動を求められるので、指示に従う。「OK」をタップ

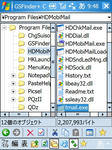
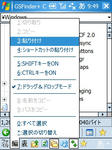
再起動後「GSFinder+ Custom」を起動し、\Program Files\HDMobiMail\tmail.exe を選択。
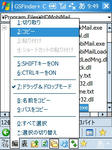
編集メニューから「コピー」を選択。
\Windows フォルダに、編集メニューから「貼り付け」を選択。
ファイルの上書きの確認ダイアログが表示されるので、「はい」をタップ。
ここで、再起動を行う。
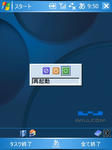
再起動後、Winキー→[プログラム]→[HDMobiMail]で起動。
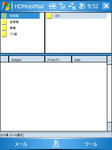
[ツール]→[オプション]→[tmail]タブを選択。
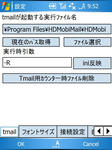
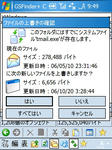
「現在のパス取得」ボタンをタップ。
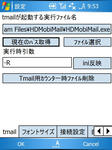
「ini反映」ボタンをタップ。
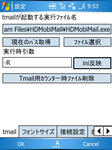
確認ダイアログが表示されるので「はい」ボタンをタップ。

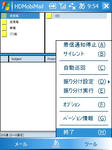
「OK」ボタンでオプション設定画面を抜けて、[ツール]→[終了]を選択し、終了する。
Winキー→[プログラム]→[オンラインサインアップ]
画面の「設定する」をタップ
しばらくこの画面…
設定完了画面になったら、「切」をタップ
またしばしこの画面…
メールソフトのラジオボタンで「メール」を選択!
推奨されてるW-ZERO3メールではない!
「OK」をタップ
再起動を求められるので、指示に従う。「OK」をタップ
再起動後「GSFinder+ Custom」を起動し、\Program Files\HDMobiMail\tmail.exe を選択。
編集メニューから「コピー」を選択。
\Windows フォルダに、編集メニューから「貼り付け」を選択。
ファイルの上書きの確認ダイアログが表示されるので、「はい」をタップ。
ここで、再起動を行う。
再起動後、Winキー→[プログラム]→[HDMobiMail]で起動。
[ツール]→[オプション]→[tmail]タブを選択。
「現在のパス取得」ボタンをタップ。
「ini反映」ボタンをタップ。
確認ダイアログが表示されるので「はい」ボタンをタップ。
「OK」ボタンでオプション設定画面を抜けて、[ツール]→[終了]を選択し、終了する。
PR
この記事にコメントする
この記事へのトラックバック
この記事にトラックバックする:


